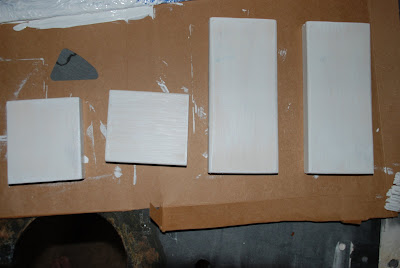
These are 8 inches tall and 4 inches wide. My dad already had this wood at his house so, he cut it for me and rounded the edges for me. You can get the needed wood at Lowes, and they can cut it for you in store.
Here are the two back pieces which are 8x4.
This is the two bottom pieces that are 4x4.
First, I painted them with a white primer because this wood has been out in my dads garage for at least oh, 3 years now. You can skip this step if you're using fresh wood.
You can paint your shelves any color you like but, our room is in red, black, and white so, I'm painting it black. I just bought a small can of paint from Walmart. It's 8oz and about $2 or $3. Once I had them painted I glued them together so I wouldn't have to worry about them moving when I drilled them together.


This is where the tools come in to play. You need to use a small drill bit and drill one to two holes through the bottom up the back. Make sure you keep them centered in the board so that you don't go through the front or back. Here's the drill bit.


This is the kind of drill I'm using. It's really simple. Screw in, switch it to reverse, and screw out.


Here is the type of nail I'm using. Make sure it is a screw nail since you're using wood. It doesn't need to be too long either.
The two holes are kind of hard to see. So this is the bottom of the 4x4 piece and it is going to go into the thin bottom of the 8x4 so that it looks the way I showed earlier.
Now that we have them put together we're going to put a mirror on each one. We're going to put candles on the shelves and the mirrors will reflect the light from the flame. I am using the mirrors from a couple of makeup compacts I have.


It took me a few tries to figure out how to get the mirror off but, here's how I finally got the mirror off. We're going to be using the drill bit again. Also, I should mention, you can buy this drill at Walmart as well as the drill bits. I'm not sure how much it is but, it's well worth the money. You will use it many, many times. You can even use it for putting those toys together! Here is the drill bit I used. It's the smallest one I have.


Going from behind the mirror you're going to drill through the plastic. Drill in the very middle first (take your time and don't push too hard) then go out aways and work your way around until the mirror finally comes off. There is only glue in the very middle of the mirror so, it's just a matter of getting it to let go! Here's where I drilled to get it out.


When you take the mirrors off they will already have glue on them. Just put your candle on the shelf to figure out the best spot to put the mirror then stick it on. If it doesn't have glue or it's not sticky enough just use super glue in a few spots to stick it on. Another thing you can do is to lay the mirror in between two pieces of cloth and break it, then glue it on in the circle shape. However, I will warn, breaking probably won't be as easy as you think because it is a compact and meant to be stronger.


Now, I'm going to decorate my candles. I'm using white candles. These are a little over $2 at Walmart and about 6 in tall.
I'm putting two stripes around the bottom half of the candle. First, I put the ribbon where I wanted it to start and used a small pin to put it in place. I wrapped the ribbon around the candle then used Liquid Stitch to glue it in place once I got it wrapped all the way around. You can buy liquid stitch at Walmart over by the Fabric. It's the stuff I used to put the ribbons on my headboard. Here's my candle with the first stripe on it.


NEXT PROJECT: Not really sure yet! Guess we'll just have to wait and see!


1 comment:
I was sure that I had left you a comment telling you that you won the School Memories ePlanner, but it seems I never got around to leaving the comment. Please send me an email at jennifer@listplanit.com so that I can send you the ePlanner. Thanks!
Post a Comment