Friday, May 30, 2008

Hung Up Some Stuff

I don't have another new project for you yet because the next project is going to be a big one and I'm still working on it! lol In the meantime, here is the results of hanging up some of my previous projects.


I'm still need to remove that floor lamp or put a shade on it instead of that glass bulb. Also, a small project I'm doing tomorrow is making two small shelves and putting a round mirror on them and then hanging them, one on each side of the headboard, then putting a candle on them.


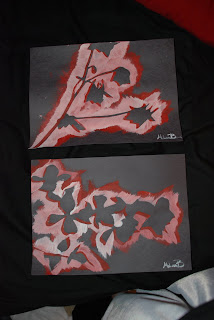
These are the silhouette pictures I made using two of my photos. Next I'm making our names in chinese characters vertically and hanging them above those pictures, one on each side.

NEXT PROJECT: Wall shelf/wall candle holder! lol This is just a little project to hold you over till I finish the big project!!

Wednesday, May 28, 2008

Cheap Way To Hang Photos

Our living room only has three walls. One of them is a half wall that has stairs on the other side of it, one has two windows next to each other and then only about 3ft of wall on the left of the windows. The other is long and white and bleh. So, to decorate it as cheaply and as awesomely as possible (lol) I will be hanging some fun pictures of us, our friends, and our family. I'm just using some fun snapshots from over the years and new ones along the way. Instead of buying tons and tons of frames I'm using styrofoam. Styrofoam? Yes.

Here's what you do:

All you have to do is buy a sheet of styrofoam (about $6 at hobby lobby) and cut squares out of it. Then you just glue or tape on the foam squares to the back of your photos. You only need one rectangle of foam for 4x6 and 5x7 photos and two in the middle or one on each corner for an 8x10 or larger. Then all you have to do is use those little bitty nails and put them in the wall and just put the foam right on the nail. If the photo is going horizontally I suggest one square on each end to keep it straight. You can even use paper frames like they use in scrapbooking to put around the edges of the pics if you want them to be more decorative. You can also cut the squares to be thinner if you want them closer to the wall or vary the thickness to add some contrast to the photos.

Here's an example:


I actually painted this picture on a small canvas I bought at WalMart. I'm not too happy with it but my hubs likes it so, in the bathroom it goes! lol This is straight on.

Here's one from the side:


I had actually made a 2008 out of styrofoam to use for senior photos for a friend so I just cut that up to use for the squares.

Tuesday, May 27, 2008

Handmade Tutus

I just thought I would share the tutus I made. If anyone is interested in purchasing one just leace me a comment. They are really affordable and super cute. These aren't the best pictures because I still need to upload the pics of the little girl wearing them but here's a couple samples.


These two are still a little messy from this weekend. This one is actually a neon pink and black. It's more of a punk look.


This one is more of a classic girlie tutu. The pink is actually a lighter, softer pink then this shows. They are both the same length when straightened out and are size 3T. I can make these tutus in any color, size and style. All tutus are custom and handmade. If you'd like one or would like to know about pricing just leave me a comment and I will get back to you.

Still working on my next project! It's a surprise though so, you're going to have to wait to find out what it is! lol

Monday, May 26, 2008

Updated Shelf

I found this shelf in my dad's closet, and stole it! lol Except, it's been in my son's closet for about 4 months now. lol Anyways, I was hanging some things today and decided it was time to do something with that shelf! So, using the handy dandy acrylic paint I always use, I mixed some blue and white to make the blue lighter and painted this shelf. I had letters spelling out my sons name that used to be hanging in his old room but hadn't rehung them since they are white and his new walls are also white. Instead of hanging them I put them on this shelf along with a little giraffe since his room is a jungle like theme. Here's the finished picture:


Hope this might have inspired you!

NEXT PROJECT: It's a surprise. Which, really just means, I'm not sure yet! lol

Updated TV Stand

This project was really just to get these shelves out of my closet and in to good use. What I did was get some long screws with a pointed end and screw them into the side of my tv stand. Now it looks like one bigger better tv stand. Here's a picture of it all put together.


Right now it's got a lot of clutter on it but you can see the three different things. There are the two shelves on the outside that are a lighter color and then the one in the middle that is darker. I still need to paint it but will be doing that next week.

In the meantime, all you have to do to paint something like this to match is first, paint it with primer so that it will all be the same shade. Then, from there you can paint it whatever color you want. In this case, I will be painting it black. I'll be removing the clutter and painting it next week and will post the results once I'm done!

Hope you're at least somewhat inspired by my almost finished project!

NEXT PROJECT: Redoing a shelf to make it decorative for my sons room!

Friday, May 23, 2008

Homemade Headboard

I actually saw this on an HGTV show a couple years back. I just finished mine though. Unfortunately, I think it might be too big or something. My hubby hasn't seen it yet though so maybe he'll confirm my sneaking suspicion that I'm just crazy! lol

Making a headboard is really simple. All you need is:

A sheet of wood whatever size you want your headboard
Quilt batting
Fabric in whatever color or pattern you want
Staple gun, and obviously, staples lol

All you have to do is start with a piece of wood the size you want your headboard to be. You don't need any expensive fancy wood. The piece I used is about a half inch thick and something my dad just happened to have in his garage. Here's a picture of the back of my finished headboard so you can see the wood. I forgot to take pictures of it before I started.

Once you have the wood you just put some quilt batting over the whole piece. You just layer it however thick you want your headboard to be. Once again, forgot to take pictures from the beginning so you're gonna have to use your imagination on the next couple of steps.
After you have it how thick you want it you wrap the material over the whole thing and around the back a little bit. This is where you need your staple gun. From here you just staple the fabric and batting to the back of the wood.
On my headboard I used red ribbon and had it go diagonally across the head board in two directions. Then I put a button at every intersection. Learn from my mistake. Use small staples and staple where the button is going to go first. This way, you can just sew the button to the staple and not the headboard and the whole process will go much faster! lol
Here is my finished headboard.


These are one of the easiest headboards to make especially when it's not a king size like mine! lol This would probably be even easier for a smaller headboard. Either way about it, it's easy. It only takes a few hours worth of work. Although, I advise taking breaks other wise your little fingers are going to be hurting from all the buttons! Also, I forgot to mention. To put the ribbon on I used what is called Liquid Stitch (stitchless sewing). It's with the fabric/sewing supplies. One tube was enough to do my whole king size headboard.

Hope this inspires you!

NEXT PROJECT: Entertainment center from a really old crappy tv stand and shelves that have been taking up space in my closet!

Turning a Journal Into a Photobook

This doesn't have much to do with decorating the home but I found this journal and realized it was time to do something with it. So, you can get these blank journals just about anywhere and anysize. Any craft store or book store should have them. I got mine at Walden Books. Here is a picture of it open.


You can usually get them in different colors but I had planned on turning it into a creative journal and wanted room to customize it how I wanted it. Well, life had other plans for me! lol Photography is my calling so instead, I'm going to make it more like a creative brag book (one of those small photo albums you can fit in your handbag).

All I did was paint the front and back of it with some acrylic paint I aready had. It's the same paint I used to paint the M&B but different colors. Plain purple isn't that great so I used some stencils and mixed silver in with the purple and put the words: Imagine, dream, create. They sounded like good words to go along with photography. I have a space at the top because I'm going to put either my name or the name I'll be using for my photography business but haven't decided which one yet.


Then all you have to do is use a little dot of glue in each corner of the photo and put it on the paper! From there you can put decorations on the page or talk about the photo. The rest is up to you.


When you're putting your photos in the book make sure you remember the following: Use quality prints or skip pages. Sooner or later the photos are going to start diminishing from rubbing against each other. Page protectors are available in different sizes.

Also, when you're putting photos in and you have photos that go side to side make sure they all face the same direction. So, if you have to turn the book to the left to look at one photo, it should go to the left for all photos. This just makes it easier for people to look at.

If you're wanting to do a journal, like I originally wanted but, don't know where to start...Start with a picture. You can use your favorite picture and explain why it's your favorite picture or a family picture and talk about your family. If you're a shutterbug like me you can pick your favorite picture from the day or the most relevant photo and talk about it and the events leading up to it and after it.

Hope this inspires you!

NEXT PROJECT: Headboard

Tuesday, May 20, 2008

Painting Wall Art

I made some paintings for our room over the weekend. I took some of my photos and traced them from my computer screen the size I wanted them on white construction paper, then cut them out, then used red and painted outwards from the cut out, then used white and painted outwards while some of the red was still wet. I just painted them on to black construction paper because it looks much blacker in real life than in my photos.
Here's the pics I used for my paintings.


And here's what I made with them.


I also found some chinese characters online and have only made 1 so far but am going to make another one plus our names. Like I said the paper is much blacker in real life and the reds are much redder also. Our room is modern with a few asian hints in it, being the chinese characters and the flower art. I saw these really cool votive candle holders a while back. They look like little silk red oriental lamps on a little black base. They would be perfect in our room! They were on clearance at Target for about $5, I think. I just hope I can find them again.
NEXT PROJECT: Turning a blank journal into a cool portfolio for photos! No, it has nothing to do with my apartment but I found it and wanted to decorate it! lol

Monday, May 19, 2008

M&B

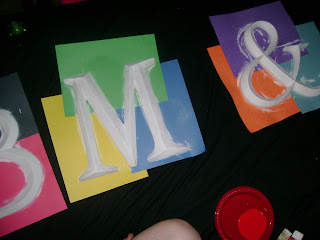
I bought these big gold letters from Hobby Lobby. They were half off so I got them for $5 a piece. They are at least 12in tall and then 10-12in wide depending on the letter. The only problem with them is, they are not our style, at all. Here's what I did to make them totally original and our style.


First here's what they looked like in the beginning:


First, I painted them white so that the colors would show up brighter.


We don't get the newspaper so I used construction paper under them. lol

Next, I painted them red.


Ater that, I used silver paint and put drip/splash marks on them.


The color is actually much redder but the flash is messing with the color.

All I used to paint them was acrylic paint. I already had mine but they are just the little bottles of Apple Barrel acrylic paint. You can get them at any craft store or Walmart has them also. I don't remember how much they were but I think they were less than $2. Now I just have to hang them! lol

Where's the creativity?

So, we've been living in our apartment for about 4 months now. We have all of our furniture and where we want it to be but my walls are still bare. I'm going to be sharing all my projects I do to decorate my house and how you can do it too. I'll be making all my own projects, or using things I already have, and be doing it cheap!